;)

;)
;)
;)
;)
;)
;)

;)
;)

;)
;)
;)
;)
;)
;)
;)
;)
;)
;)

;)
;)
;)
Examity Authentication and Proctoring
- If you have not established your Examity profile, you must do so before proceeding with the following steps (see Examity Profile Setup instructions)
- You must complete Examity authentication BEFORE starting your quiz or exam. Failing to do so will result in a 0 (zero) score on this quiz.
- Be prepared to move directly from authenticating your identity in Examity to taking your quiz or exam. You must start this quiz immediately after completing authentication in order to receive credit.
- Please run an Examity automated systems check before you continue.
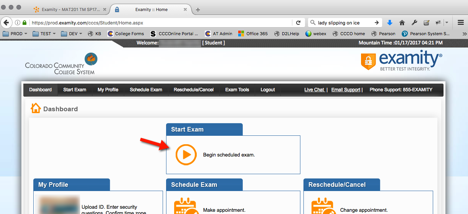
- When it is time to take your exam (see the article on Scheduling your Exam for more information), click the Examity link in the D2L content area. This will take you to the Examity dashboard. Click on the icon in the Start Exam area:
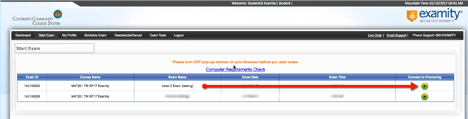
- Clicking on the Start Exam icon will take you to a screen where any scheduled exams will be listed. In the far right column, under Connect to Proctoring, click the green play button to start the authentication and proctoring process.
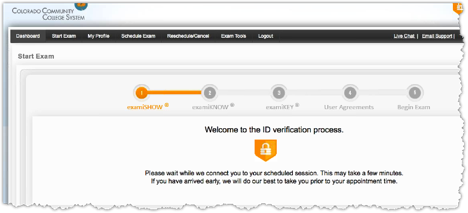
- You will see the Welcome to the ID verification process page with a progress indicator (the padlock icon). Note that if you are early to your exam appointment, you may have to wait a few minutes for a proctor to become available.
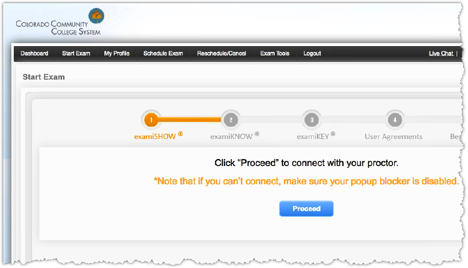
- When the proctor is available, you will see a message stating that you can click the Proceed button to connect to the proctor.
IMPORTANT NOTE:
*** If you see a popup or dialog requesting permission to run
*** “Citrix Online Web Deployment”, click Allow/Yes;
*** Sometimes this opens in a very small window on the upper left
*** of your screen. Expand this if needed
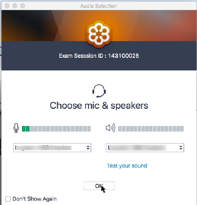
- If you get a popup window with audio controls, verify that you are using the system speakers and microphone (headsets are NOT allowed). Once this has been set, click OK
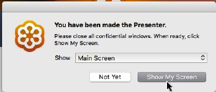
- When you see the dialog box stating that you have been made the Presenter, click the button to Show My Screen
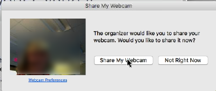
- Next, you will be asked to share your webcam. Click the Share My Webcam button.
*** Now the proctor will talk you through the next several steps.
*** If there are any differences between these directions and what the proctor requests, please follow the proctor’s instructions.
- Once the proctor is visible on the GoToMeeting Viewer window, he/she will begin the live authentication process.
- The proctor will read through the rules and other information regarding the exam and authentication process.
- When requested, show the photo ID used to create your profile.
- The proctor will then read the rules specific to your exam. You will verbally agree to each rule as they are read (or ask them to repeat the rule if you do not understand what is said.)
- The following rules will apply to all exams:
- Keep the online meeting application and exam window open during the entire exam. Windows can be closed only after the exam is submitted.
- Do not close the Examity GoToMeeting browser window or the exam window until after you receive confirmation your exam was submitted.
- No internet searches are allowed
- No talking during the exam.
- You must remain visible to the webcam the entire time.
- Use the Examity Support contact link if you need technical help
- Your cell phone may ONLY be used for responding to a call back from Examity proctor in case you are disconnected from your proctor during the exam.
- After reading through the rules, you will be asked to rotate the camera 360° to show the entire desk and workspace.
- After showing your desk and workspace, examSHOW, you will be directed to click on the “Next” button on the Examity window:
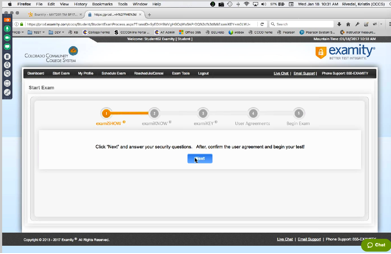
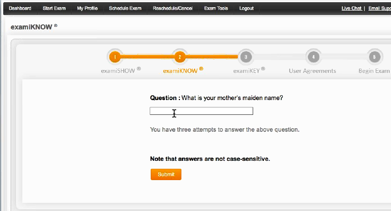
- In the next screen, enter the answer to the security question, examKNOW, you selected when setting up your profile:
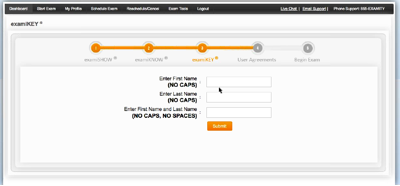
- Once that has been answered successfully, you will be taken to the biometric signature page, examKEY, where you will type your first name, last name and first and last name (no caps, no spaces) in the boxes provided:
- In the next screen, you will click the radio buttons indicating that you agree to the user agreements and exam rules.
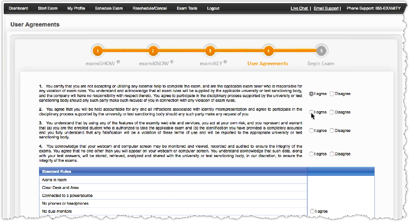
The following are the user agreements and exam rules shown in the screenshot above:
- You certify that you are not accepting or utilizing any external help to complete the exam, and are the applicable exam taker who is responsible for any violation of exam rules. You understand and acknowledge that all exam rules will be supplied by the applicable university or test sanctioning body, and the company will have no responsibility with respect thereto. You agree to participate in the disciplinary process supported by the university or test sanctioning body should any such party make such request of you in connection with any violation of exam rules.
- You agree that you will be held accountable for any and all infractions associated with identity misrepresentation and agree to participate in the disciplinary process supported by the university or test sanctioning body should any such party make any request of you.
- You understand that by using any of the features of the Examity web site and services, you act at your own risk, and you represent and warrant that (a) you are the enrolled student who is authorized to take the applicable exam and (b) the identification you have provided is completely accurate and you fully understand that any falsification will be a violation of these terms of use and will be reported to the appropriate university or test sanctioning body.
- You acknowledge that your webcam and computer screen may be monitored and viewed, recorded and audited to ensure the integrity of the exams. You agree that no one other than you will appear on your webcam or computer screen. You understand acknowledge that such data, along with your test answers, will be stored, retrieved, analyzed and shared with the university or test sanctioning body, in our discretion, to ensure the integrity of the exams.
IMPORTANT NOTE:
- Do not close any of the Examity or GoToMeeting windows until you have successfully submitted your exam.

