Once you have completed Webex setup for your course (See “Setting Up Webex In Your Course” if you have not completed that step), you will see a tab for “Office Hours” at the top of the Webex window in content (if you selected that component). This guide will help you complete any setup needed for this utility.
If you have not done so, please click on the “Office Hours” tab in the Webex screen.

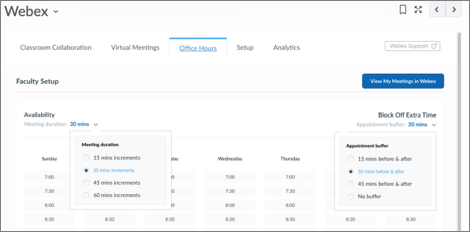
- Set the standard meeting duration by clicking on the downward pointing arrow and clicking the radio button next to the 15-, 30-, 45- or 60-minutes increment option.
- Set any desired meeting buffer (time blocked off before and after meetings) by clicking on the downward pointing arrow beneath “Block Off Extra Time”. You may select 15-, 30-, 45-minute, or no buffer.
- Once you have set your standard meeting duration and buffer, click all the times you wish to be available for office hours.
Note that the time listed is in military time format and Greenwich Mean Time zone although the first time slot per day in the chart will equate to midnight local time.
(For example, Mountain Standard time is 7 hours earlier so 10pm GMT is 3pm MST, 4pm MDT) - Scroll to the bottom of the window and click Save when you have selected your times.
- If you have Webex integrated within multiple D2L courses (within the same D2L instance), the times selected in course will also be shown in all other courses where you have set up Webex.
When a student selects a time to meet with you, both you and the student will receive an email with links to the meeting and an “Add to Calendar” link. This meeting will not appear on the course calendar nor on the list of upcoming meetings. The email is the only resource that includes the meeting link.
As students select meeting times, they are removed from the available times list so there is no risk of double-booking a time slot[DK1] [RK(2] .


